How To Remove Latest Blog In Aspire Pro
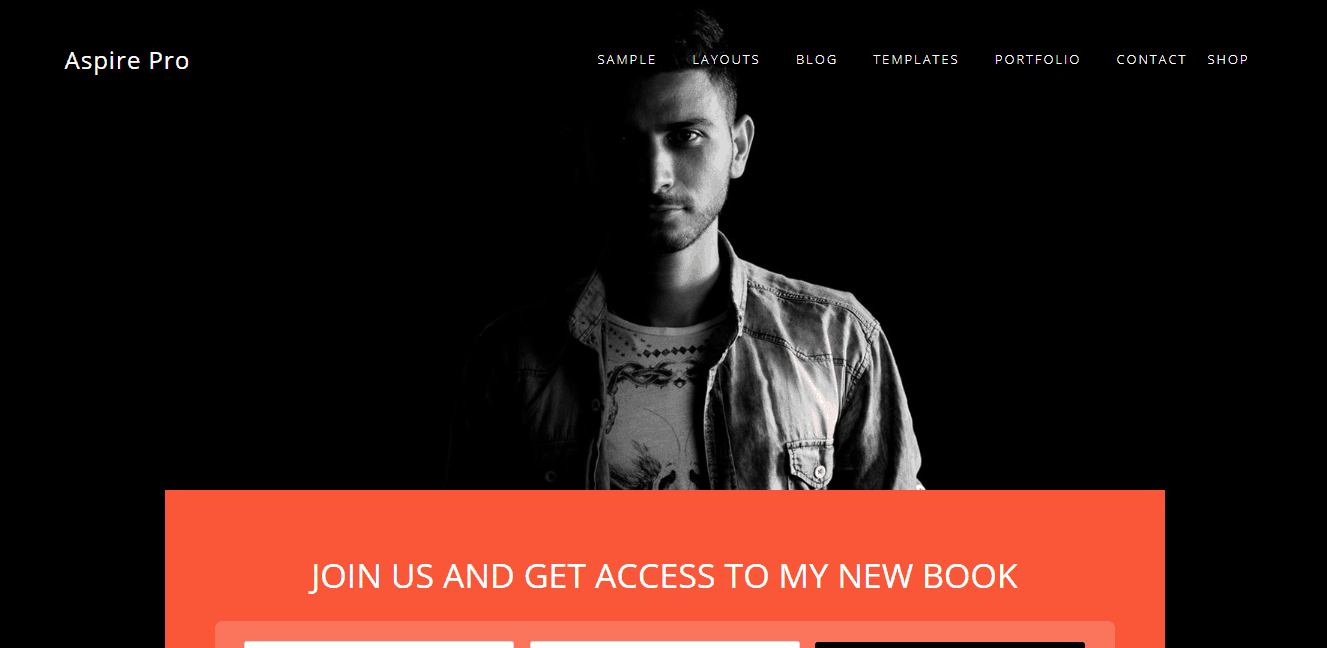
Last day, we have shared the Aspire Pro child theme review. Aspire Pro is an awesome Genesis child theme for business websites and bloggers. In this post, we will show you how can you set up the theme just like the demo, the complete Aspire Pro documentation.
Table Of Contents
-
- Aspire Pro Documentation
- Installing The Genesis Framework & Aspire Pro
- Creating Pages
- Essential Plugins
- Theme Customization
- Front Page 1
-
- Front Page 2
- Color Customization
- Front Page 3
- Front Page 4 Widget
- Home Mid Left Widget
- Home Mid Right Sidebar
- Front Page 5 Widget
- Front Page 6
- Front Page 7
- Front Page 8
- Front Page 9
- Front Page 10 Widget
- Front Page 11 Widget
- Front Page 12 Widget
- Front Page 13 Widget
- Aspire Pro
-
Aspire Pro Documentation
I hope you have installed and activated the Aspire Pro theme. If you haven't, you must install the Genesis Framework on the blog at first. After installing Genesis, you will be able to activate the child theme.
After activating the theme, you need to create two pages on WordPress blog. The first one is front page and the second is for blog posts. Make sure that you have added proper meta description and keywords on those pages.
Don't worry if you are a pure beginner, we are going to cover all of them here step by step.
Installing The Genesis Framework & Aspire Pro
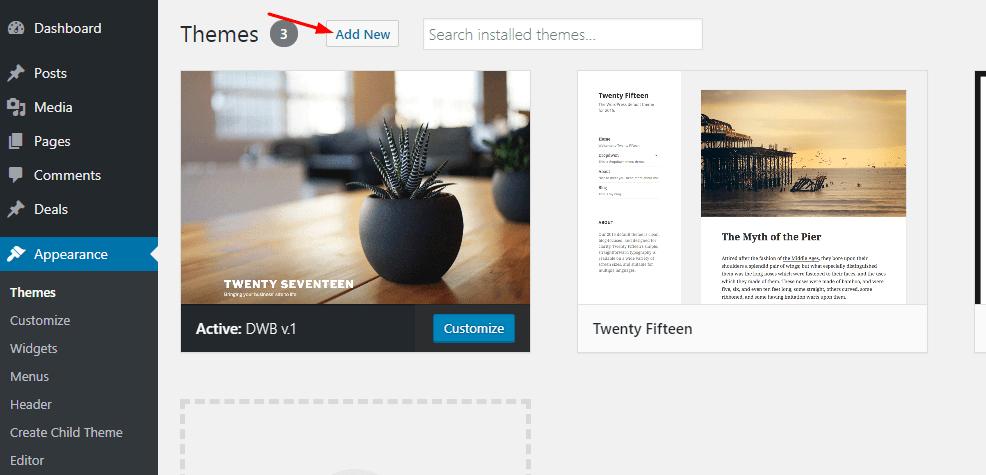
Go to the Appearance section and themes. Click on Add New theme.
Now, you need to upload the Genesis Framework from your local storage.

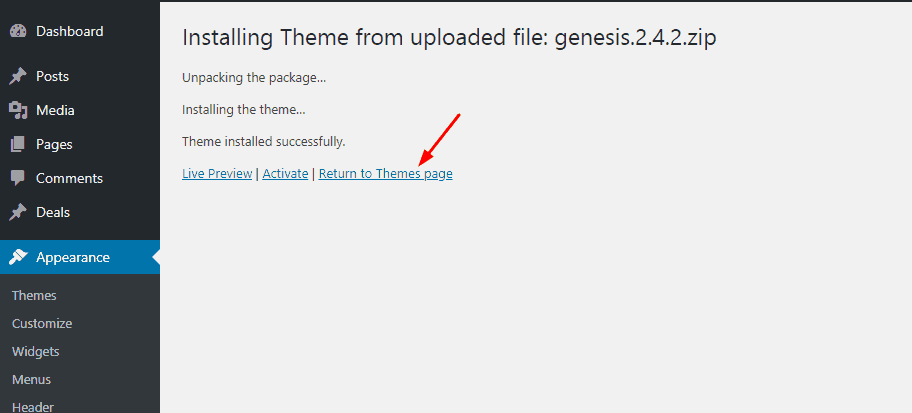
You don't need to activate it. Just keep it installed. Again, go back to the themes section.
Click on add new. This time, you need to upload the Aspire Pro theme.
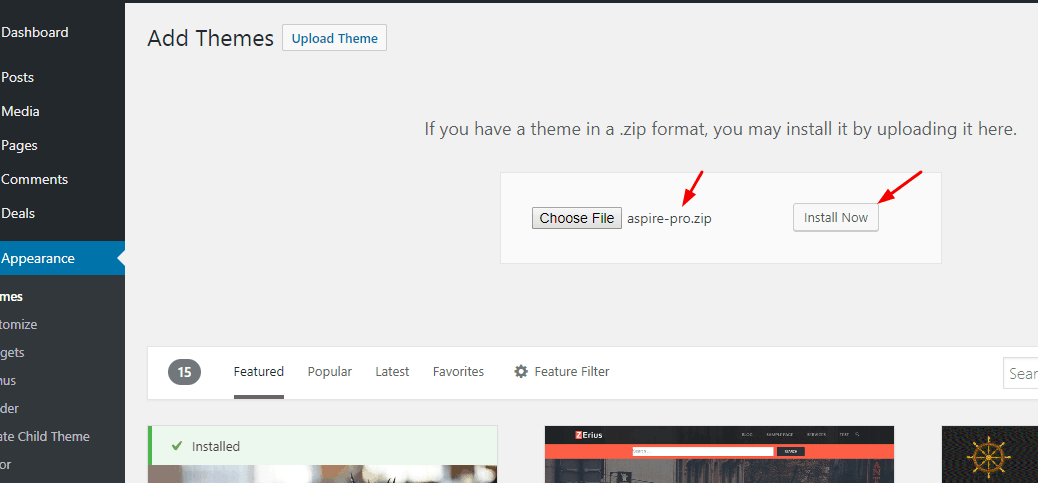
Activate it.

You can see that the theme got activated successfully.
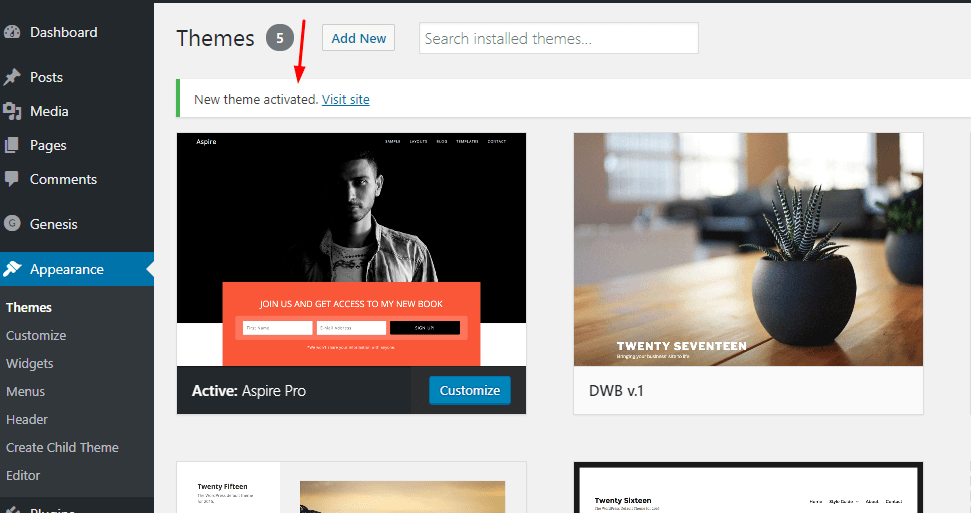
That's it. This is how you can activate the theme on your blog.
Creating Pages
You would want to create 2 pages for your blog. For a detailed guide, check out how to create pages in WordPress. One named home page and other called the blog. For creating pages, go to the add new pages and create from there.
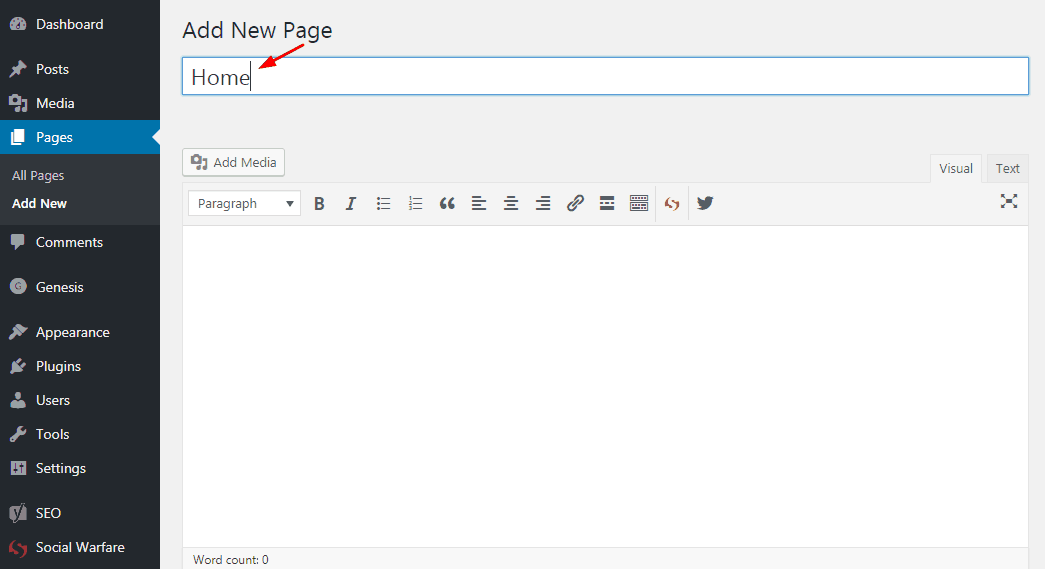
Also, you need to consider adding proper SEO ready title and meta description for both pages. For the home page, you need to use the full-width layout.
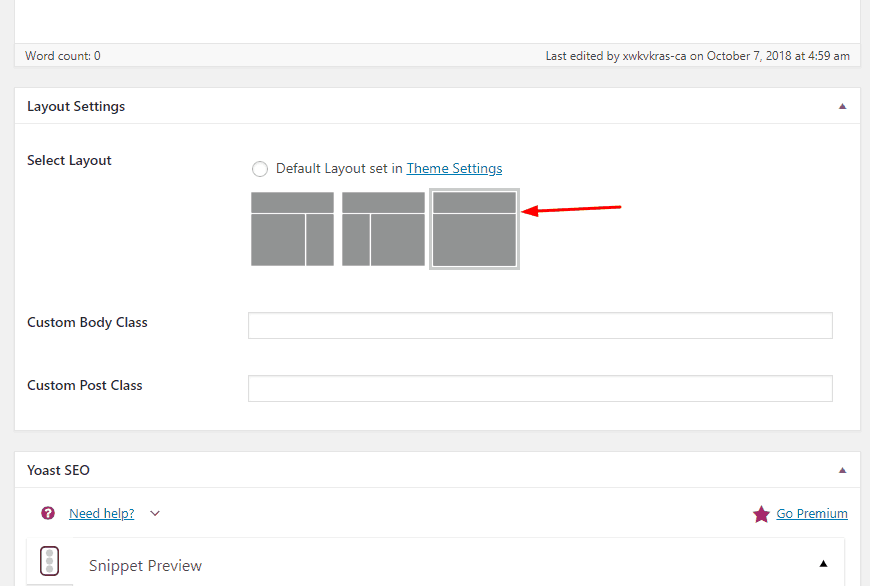
Blog page needs just the default or content/ sidebar layout. You don't need to add any contents on the page. Just keep it blank. Publish it when you are ready to go.
Essential Plugins
- Genesis eNews Extended – Best free email opt-in plugin for Genesis theme users. You will be able to link the plugin with Feedburner or any other email marketing programs like MailChimp.
- Features Custom Post Types – For fetching contents from any custom post types and showing them on the front end.
Theme Customization
Go to the WordPress Customizer.
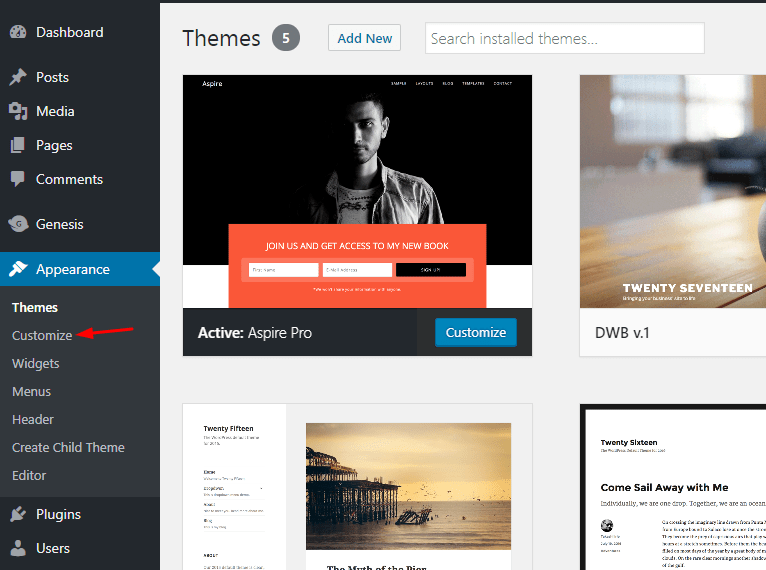
The first thing you need to do is, use the static homepage and posts pages. For that, go to the homepage settings.
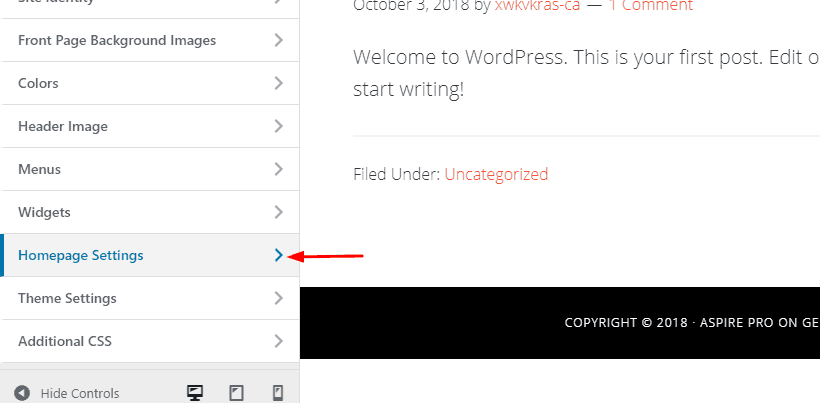
Choose the static pages that we created and publish the update.

Now, let's style the front page. Go to the widgets and front page one widget.
Front Page 1
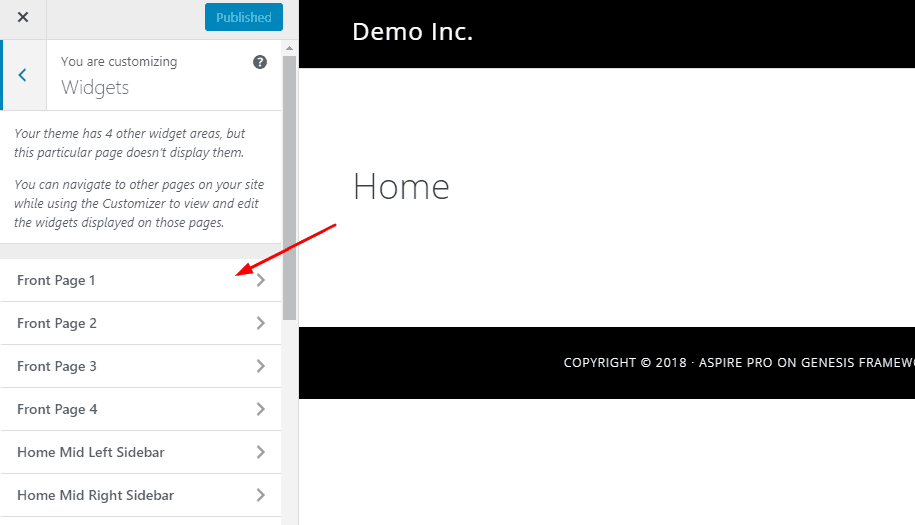
There, you need to add one text widget.
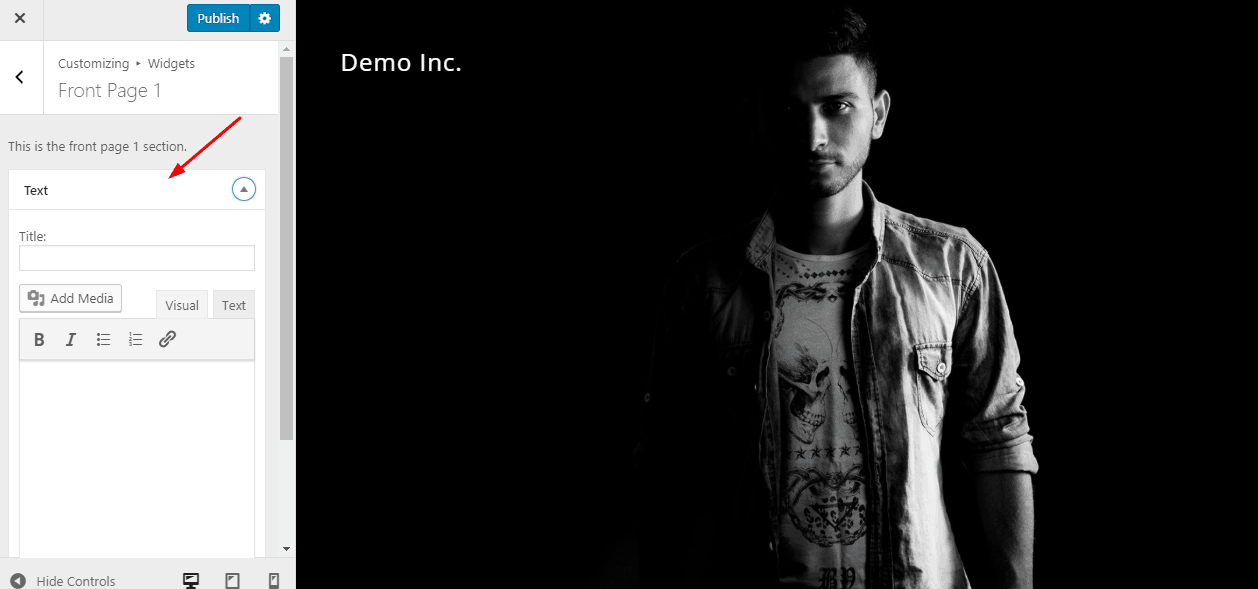
Put something in the title that you need to show on the front page.
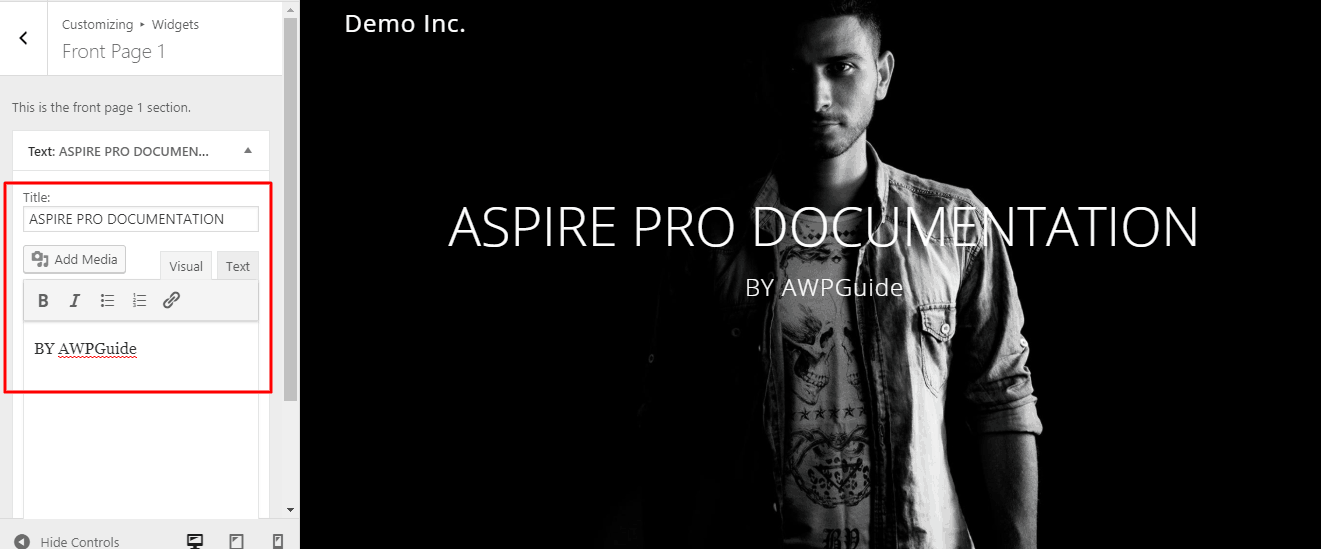
Make sure that you have published the changes. let's move to the front page 2 widget area. This widget area is for showing a newsletter subscription form. Like we mentioned above, you need to use a Genesis eNews Extended plugin's widget there.
On the other hand, you will be able to use the best lead generation plugins like OptinMonster and Bloom. For this tutorial, we are going to use the free plugin Genesis eNews Extended. Make sure that you have activated the plugin.
Go to the front page 2 widget area.
Front Page 2
Add a new eNews extended widget. Add a catchy headline then.
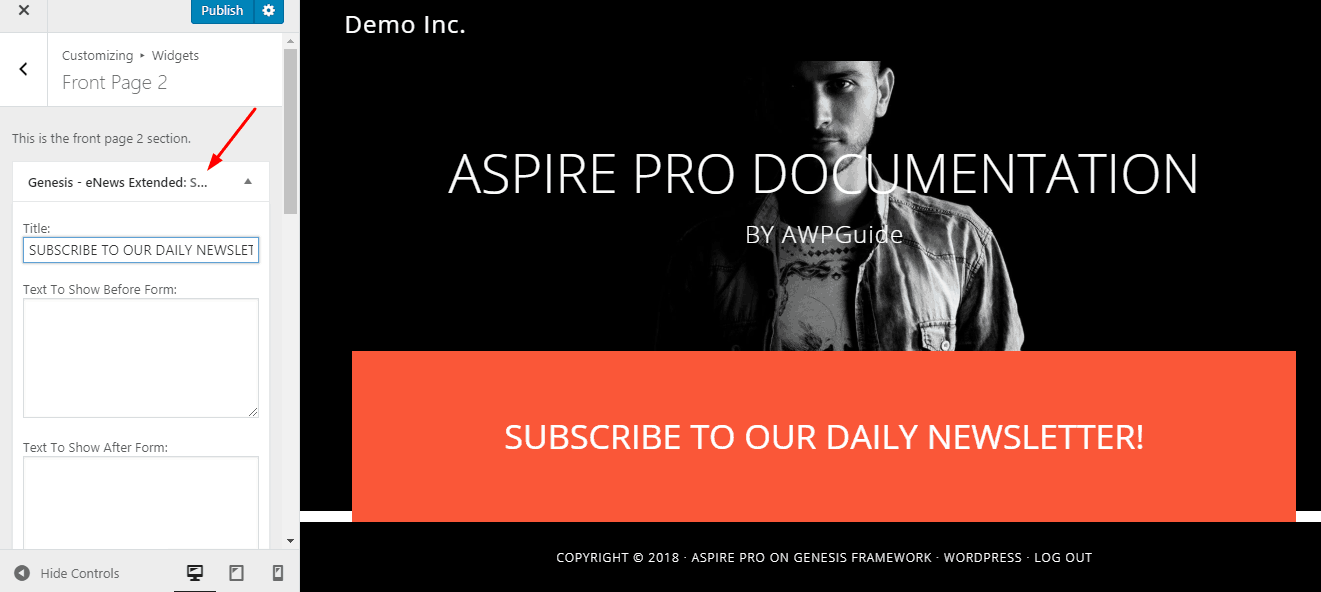
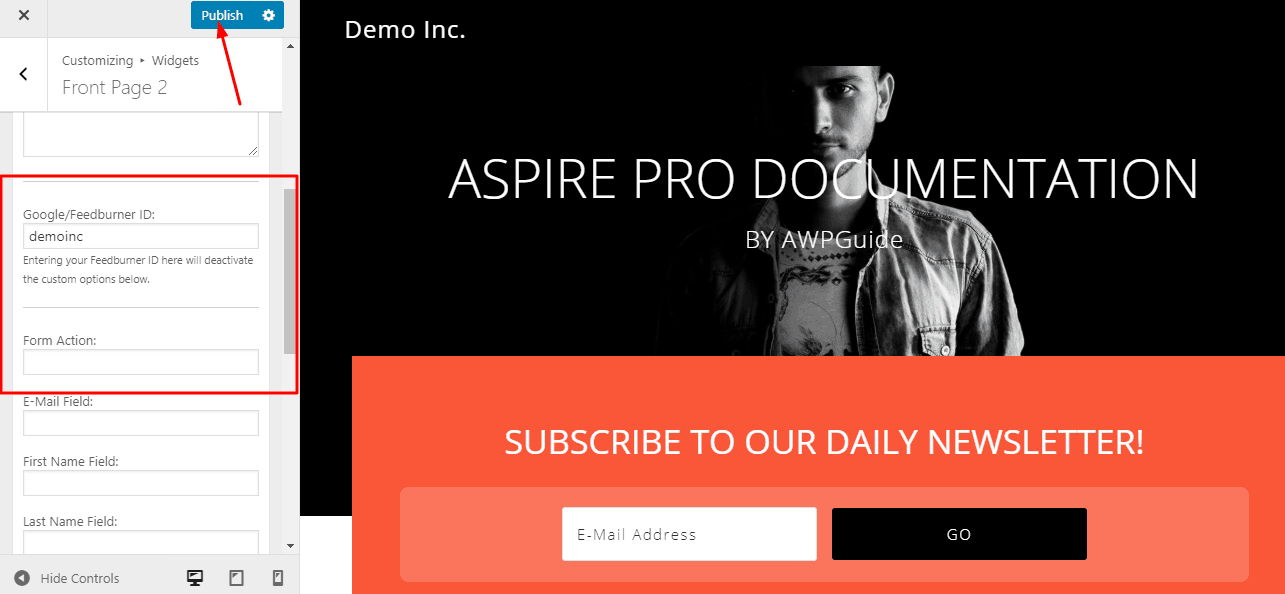
Enter your Feedburner id or form action if you are using any other marketing solutions. After making these changes, simply publish the changes.
Color Customization
If you want to change the base color of your theme, you need to go to the color options in the customizer.
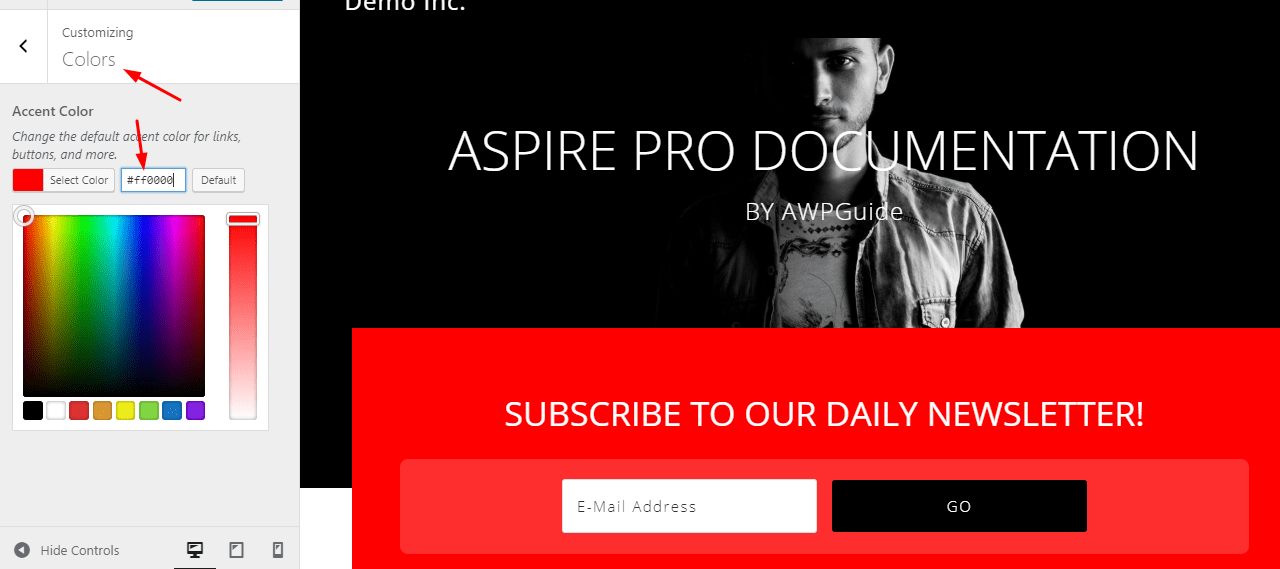
Let's move to the front page 3 widget.
Front Page 3
Go to the widget and add a new HTML widget there.
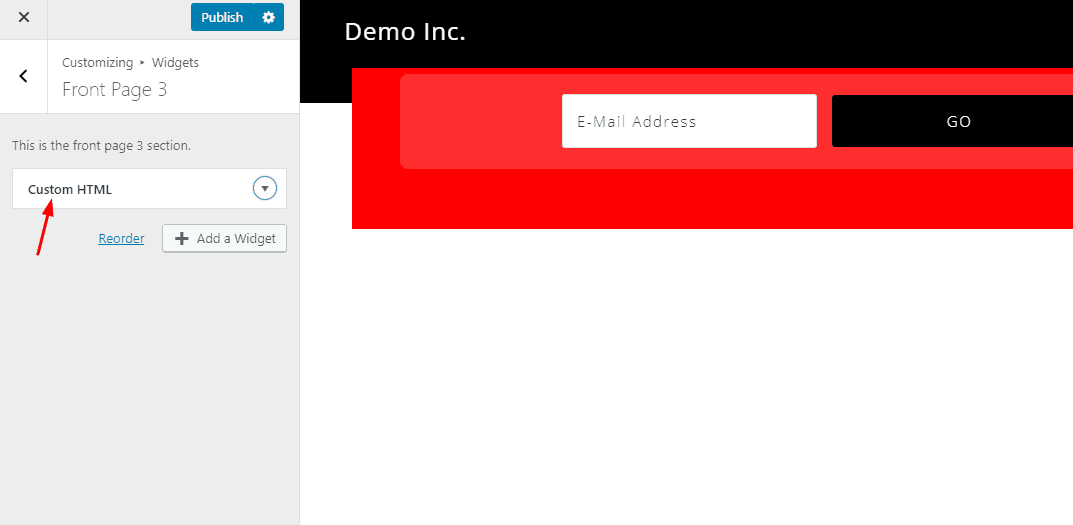
You need to add the below code on the widget.
<p>Sure, this is a demo, but we're serious here. Creating quality content is very important to the Success of your Site. But you know what else is even more important? Design. By changing your site to a more professional and up to date design, you should definitely see an increase in sales if you have the right content.</p> <a href="http://appfinite.com">Learn How →</a></p> <img src="http://demo.appfinite.net/aspire/img/a-logos.png">
publish it.
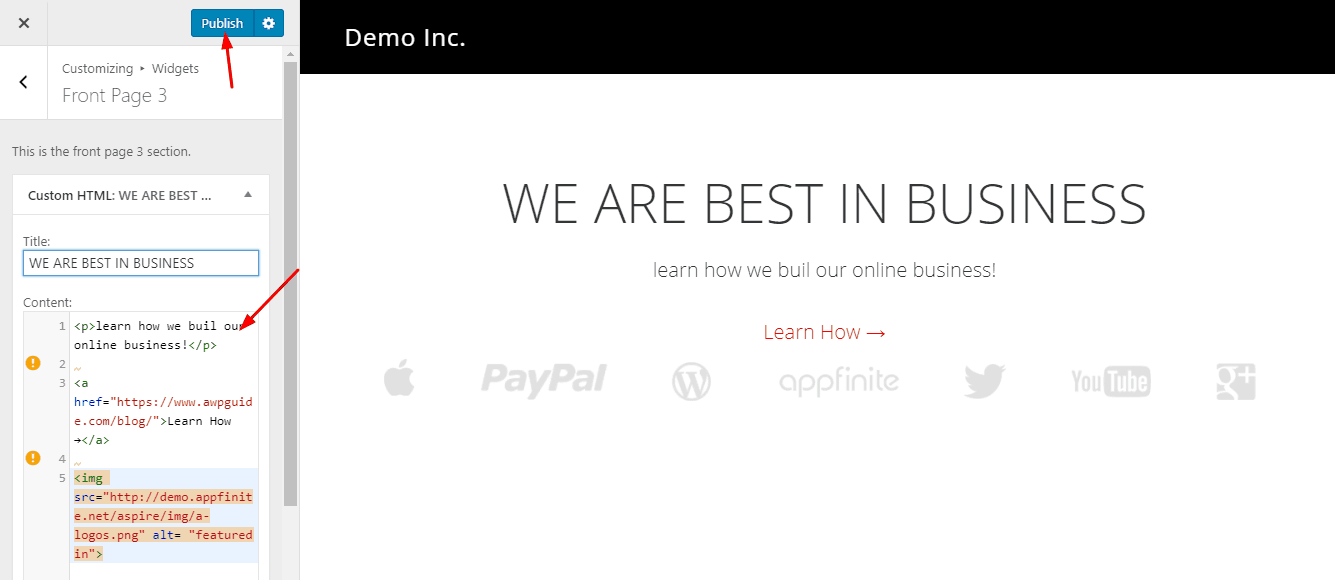
Let's move to the front page 4 widget.
Front Page 4 Widget
Add a new HTML widget on the widget area and paste the below code on it.
<div class="one-third first"><img src="http://demo.appfinite.net/aspire/img/h-2.jpg"><h3>Build a Community</h3> <p>We'll show you what you'll need to do to create a loyal Community.</p> </div> <div class="one-third"><img src="http://demo.appfinite.net/guru/img/h-2.jpg"><h3>Create Products</h3> <p>You're going to learn how to create the best products for your site.</p> </div> <div class="one-third"><img src="http://demo.appfinite.net/aspire/img/h-3.jpg"><h3>Increase your Traffic</h3> <p>We help you fix your SEO, & write content that keeps people intrigued.</p> </div> <div style="clear: both;"><a class="button large">Learn How!</a></div>
Home Mid Left Widget
This will show on the left side of your website. Simply go to the widget area, add an HTML widget to the area and paste this code on it.
Wes is a Genesis Developer that creates unique designs for the Genesis Framework. <a href="http://twitter.com/wesstraham">@WesStraham</a>
Paste the below code on it.
Elit, sed do eiusmod tempor incididunt ut labore et dolore magna aliqua.Lorem ipsum dolor sit amet, consectetur adipiscing elit, sed do eiusmod tempor incididunt ut labore et dolore magna aliqua. <p class="italic">"Lorem ipsum dolor sit amet, consectetur adipiscing elit, sed do eiusmod tempor incididunt ut labor et dolore magna aliqua. Ut enim ad minim veniam, quis nostrud exercitation ullamco laboris nisi ut aliquip ex ea commando consequat."</p> <img src="http://demo.appfinite.net/aspire/img/sig.png" style=" width: 24%;">
Front Page 5 Widget
Show a global map for your visitors using this widget area. Simply copy the below code and paste on an HTML widget area. Assign the widget to the front page 5 widget
<div class="features"> <h4>Reach more Customers Globally</h4> <div class="one-half first"> <p>We'll show you everything you need to know to get your product in the hands of consumers. Ut enim ad minim veniam, quis nostrud exercitation ullamco laboris nisi ut aliquip ex ea commodo consequat.</p> <p>Lorem ipsum dolor sit amet, consectetur adipiscing elit, sed do eiusmod tempor incididunt ut labore.</p> </div> <div class="one-half main-img"> <img src="http://demo.appfinite.net/aspire/img/map.png"> </div> </div>
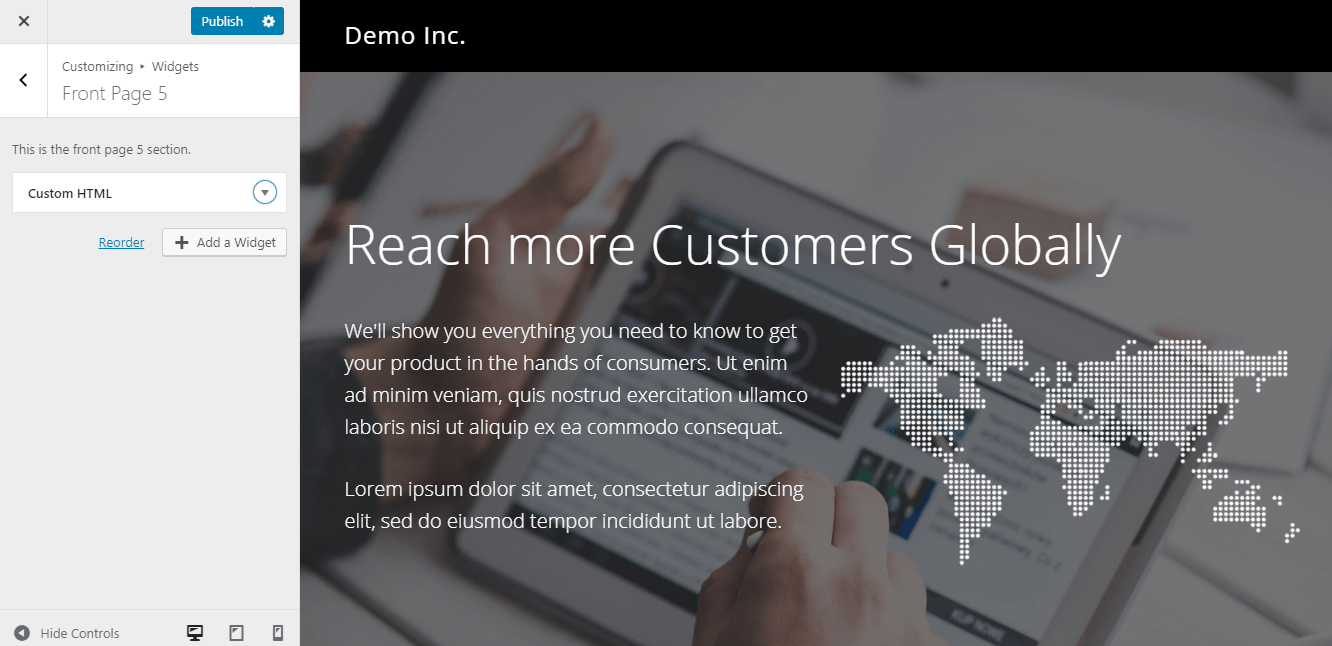
Front Page 6
The front page 6 widget is using for showing your business features. You can show font awesome icons with a brief description there. All you need to do is, go to the front page 6 widget area, add an HTML widget there, paste the below code on it.
<h4>Here's why you'll love our Program</h4> <div class="one-half first"> <div class="left-content"><i class="fa fa-code" style="font-size: 60px;"></i></div> <div class="right-content"><h3>Quality Code</h3> <p>Lorem ipsum dolor sit amet, consectetur adipiscing elit, sed do eiusmod tempor incididunt ut labore et dolore magna aliqua.</p></div> </div> <div class="one-half"> <div class="left-content"><i class="fa fa-cloud-download" style="font-size: 60px;"></i></div> <div class="right-content"><h3>100 GB Cloud Storage</h3> <p>Lorem ipsum dolor sit amet, consectetur adipiscing elit, sed do eiusmod tempor incididunt ut labore et dolore magna aliqua.</p></div> </div> <div class="one-half first"> <div class="left-content"><i class="fa fa-globe" style="font-size: 60px;"></i></div> <div class="right-content"><h3>Global Support</h3> <p>Lorem ipsum dolor sit amet, consectetur adipiscing elit, sed do eiusmod tempor incididunt ut labore et dolore magna aliqua.</p></div> </div> <div class="one-half"> <div class="left-content"><i class="fa fa-check-square-o" style="font-size: 60px;"></i></div> <div class="right-content"><h3>100% Success Rate</h3> <p>Lorem ipsum dolor sit amet, consectetur adipiscing elit, sed do eiusmod tempor incididunt ut labore et dolore magna aliqua.</p></div> </div>
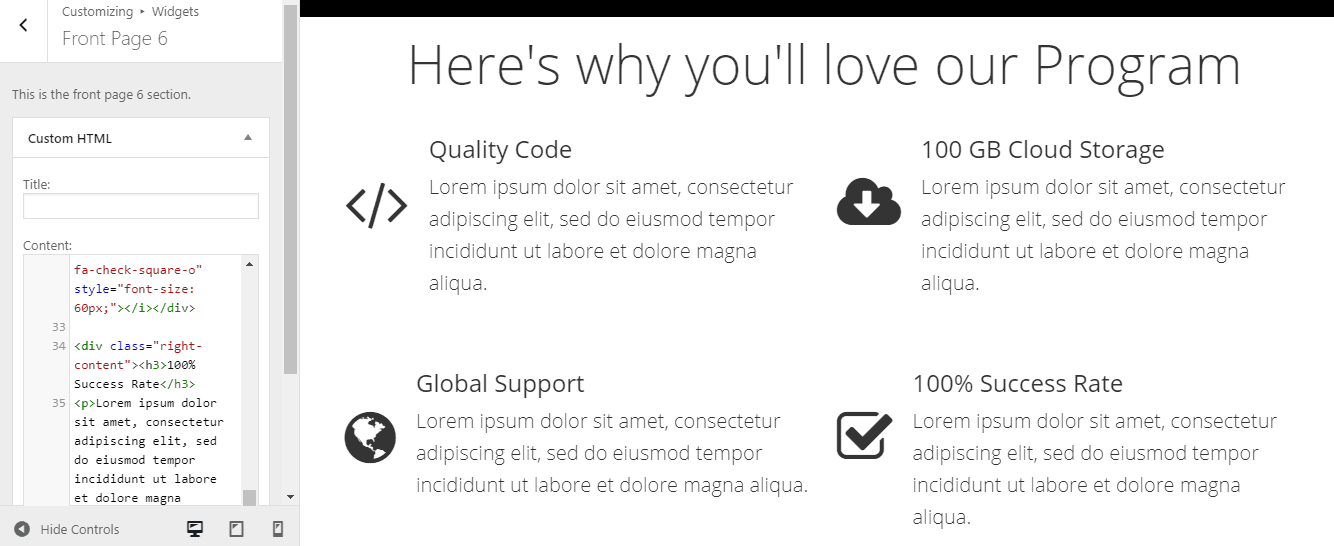
Front Page 7
This widget area s using for showcasing your aim. Just copy paste the below code on an HTML widget and place the widget under the specific widget area.
<p class="italic">"Lorem ipsum dolor sit amet, consectetur adipiscing elit, sed do eiusmod tempor incididunt ut labore et dolore magna aliqua. Ut enim ad minim veniam, quis nostrud exercitation ullamco laboris nisi ut aliquip ex ea commodo consequat. Lorem ipsum dolor sit amet, consectetur adipiscing elit, sed do eiusmod tempor incididunt ut labore et dolore magna aliqua. Ut enim ad minim veniam, quis nostrud exercitation ullamco laboris nisi ut aliquip ex ea commodo consequat."</p> <div class="centered"><h6>- Wes Straham</h6><img class="author-circle" src="http://demo.appfinite.net/optimal/img/wes-circle.png" alt="wes-circle"></div>
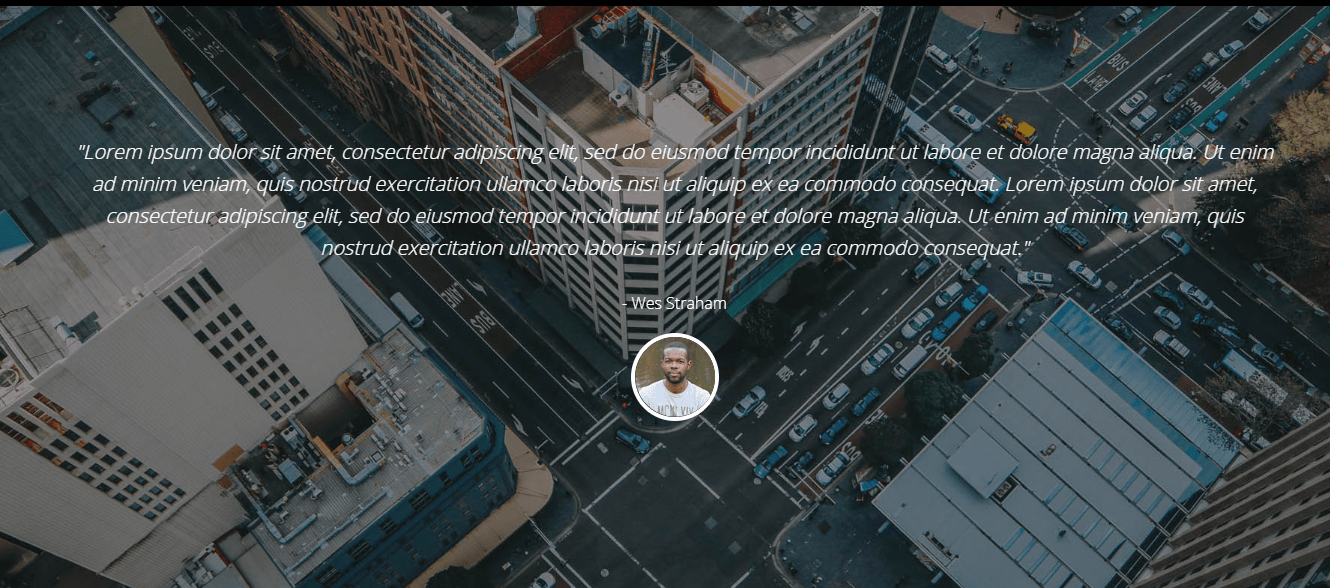
Front Page 8
This is using for showing your custom post types. You will be able to use the featured post types plugin for genesis.
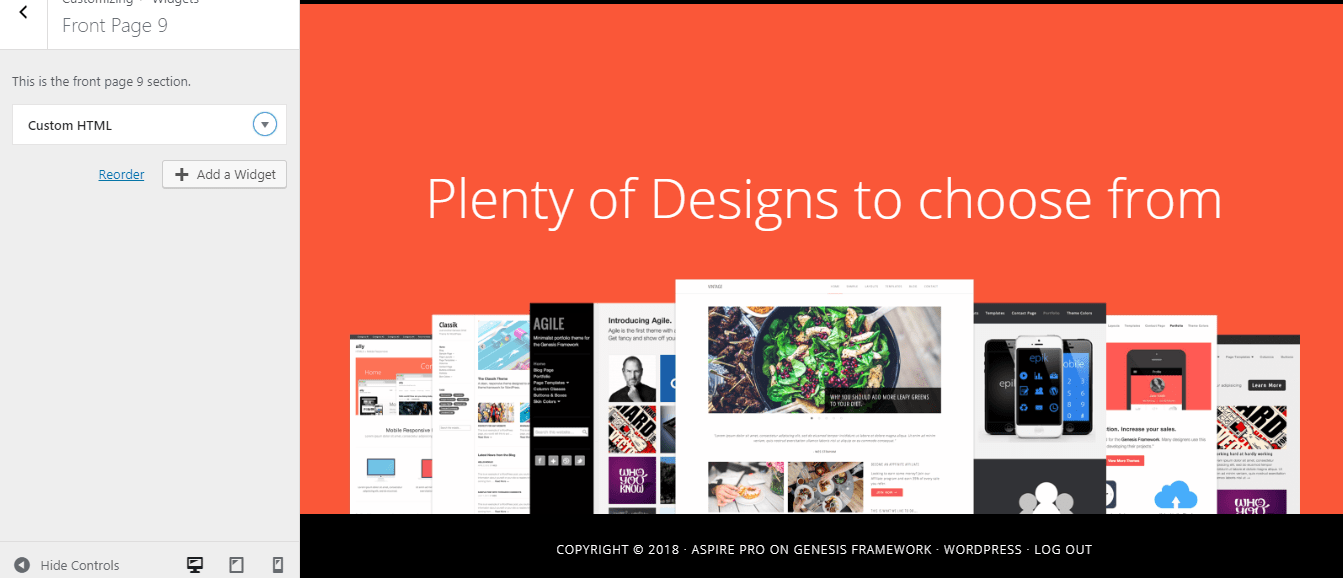
Front Page 9
Show your recent works here! Just copy paste the below code on an HTML widget.
Front Page 10 Widget
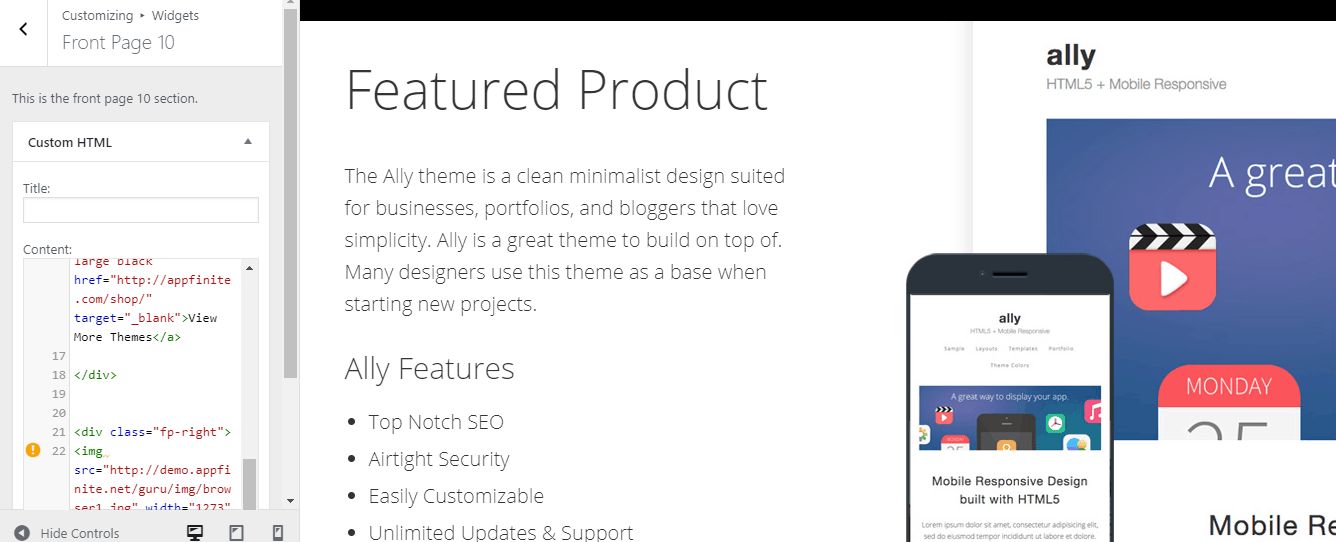
We need to use 2 widgets in this area. First, add an HTML widget and paste below code.
<div class="fp-left"> <h4>Featured Product</h4> <p>The Ally theme is a clean minimalist design suited for businesses, portfolios, and bloggers that love simplicity. Ally is a great theme to build on top of. Many designers use this theme as a base when starting new projects.</p> <h3>Ally Features</h3> <ul> <li>Top Notch SEO</li> <li>Airtight Security</li> <li>Easily Customizable</li> <li>Unlimited Updates & Support</li> </ul> <a class="button large black" href="http://appfinite.com/shop/" target="_blank">View More Themes</a> </div> <div class="fp-right"> <img src="http://demo.appfinite.net/guru/img/browser1.jpg" width="1273" height="807"> </div>
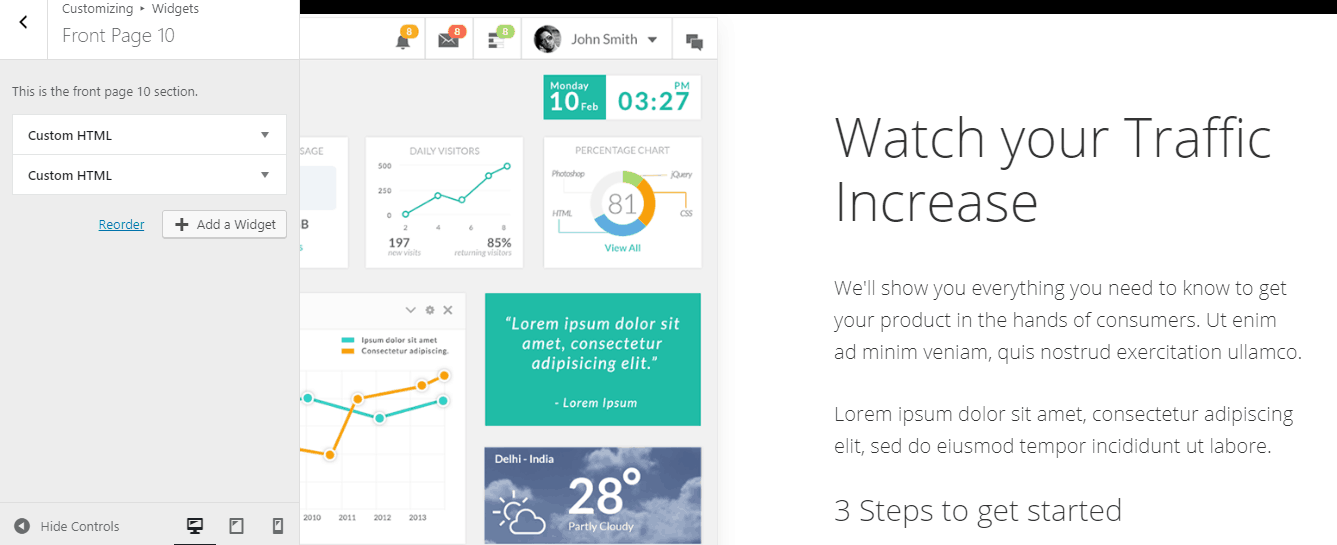
Again add a new HTML widget to the area, paste the below code on it.
<div class="fp-left2"> <img src="http://demo.appfinite.net/aspire/img/b2.png" width="1000" > </div> <div class="fp-right2"> <h4>Watch your Traffic Increase</h4> <p>We'll show you everything you need to know to get your product in the hands of consumers. Ut enim ad minim veniam, quis nostrud exercitation ullamco.</p> <p>Lorem ipsum dolor sit amet, consectetur adipiscing elit, sed do eiusmod tempor incididunt ut labore.</p> <h3>3 Steps to get started</h3> <ul> <li>Sign Up for the Program</li> <li>Promote and Share our Themes</li> <li>Earn Money for every referall</li> </ul> <a class="button large white-clear">Learn More</a> </div>
Front Page 11 Widget
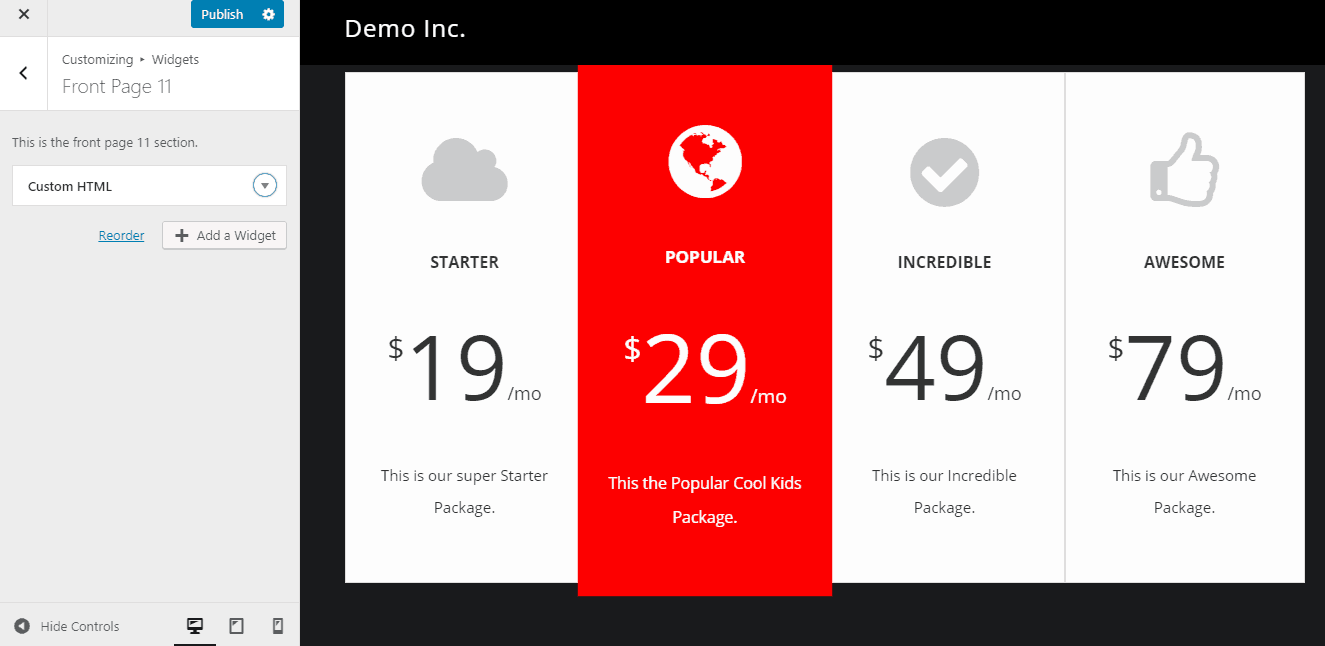
This is for showing your pricing. Just add the below code on the HTML widget.
<div class="fp-left2"> <img src="http://demo.appfinite.net/aspire/img/b2.png" width="1000" > </div> <div class="fp-right2"> <h4>Watch your Traffic Increase</h4> <p>We'll show you everything you need to know to get your product in the hands of consumers. Ut enim ad minim veniam, quis nostrud exercitation ullamco.</p> <p>Lorem ipsum dolor sit amet, consectetur adipiscing elit, sed do eiusmod tempor incididunt ut labore.</p> <h3>3 Steps to get started</h3> <ul> <li>Sign Up for the Program</li> <li>Promote and Share our Themes</li> <li>Earn Money for every referall</li> </ul> <a class="button large white-clear">Learn More</a> </div><div class="plans"> <div class="plan"> <i class="fa fa-cloud" style="color: #ccc; font-size: 80px; margin-bottom: 40px;"></i> <h6 class="uppercase"><strong>Starter</strong></h6> <div class="price"><sup>$</sup>19<span class="monthly">/mo</span></div> <small>This is our super Starter Package.</small> </div> <div class="plan popular"> <i class="fa fa-globe" style="color: #fff; font-size: 80px; margin-bottom: 40px;"></i> <h6 class="uppercase"><strong>Popular</strong></h6> <div class="price"><sup>$</sup>29<span class="monthly">/mo</span></div> <small>This the Popular Cool Kids Package.</small> </div> <div class="plan"> <i class="fa fa-check-circle" style="color: #ccc; font-size: 80px; margin-bottom: 40px;"></i> <h6 class="uppercase"><strong>Incredible</strong></h6> <div class="price"><sup>$</sup>49<span class="monthly">/mo</span></div> <small>This is our Incredible Package.</small> </div> <div class="plan"> <i class="fa fa-thumbs-o-up" style="color: #ccc; font-size: 80px; margin-bottom: 40px;"></i> <h6 class="uppercase"><strong>Awesome</strong></h6> <div class="price"><sup>$</sup>79<span class="monthly">/mo</span></div> <small>This is our Awesome Package.</small> </div> </div>
Front Page 12 Widget
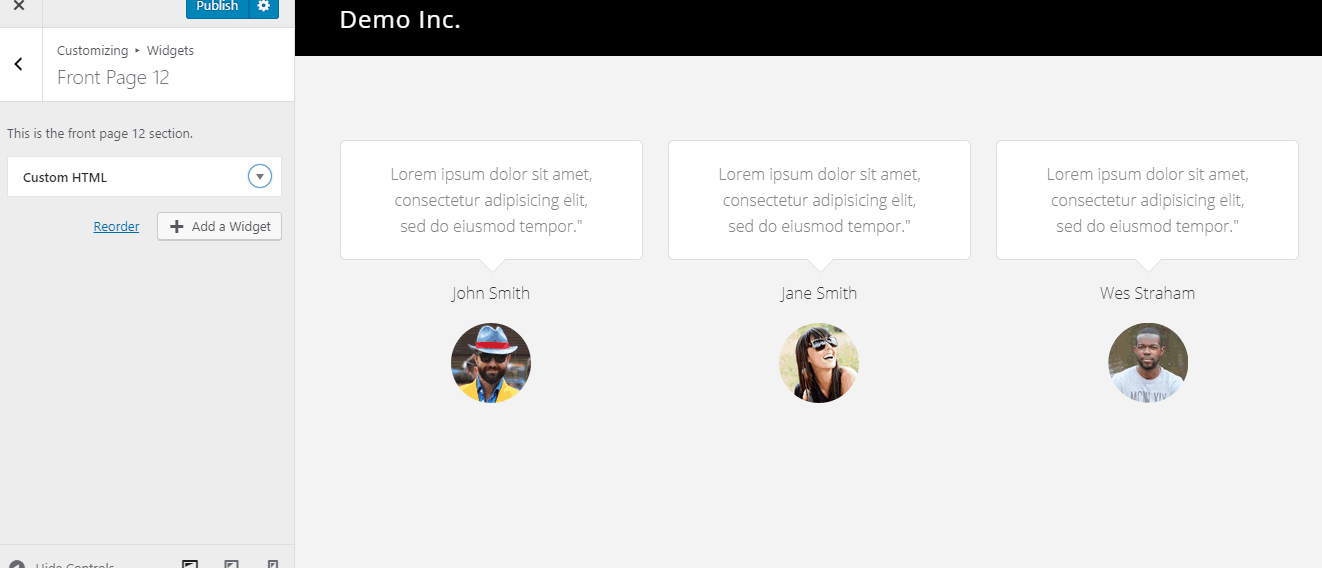
This is for showing testimonials. Go to the widget area, add an HTML widget. Paste the below code on the widget.
<div class="one-third first"> <div class="quote">Lorem ipsum dolor sit amet, consectetur adipisicing elit, sed do eiusmod tempor." </div> <div class="quote-arrow"></div> <div class="centered"><h6>John Smith</h6><img src="http://demo.appfinite.net/aspire/img/john-circle.png" alt=""></div> </div> <div class="one-third"> <div class="quote">Lorem ipsum dolor sit amet, consectetur adipisicing elit, sed do eiusmod tempor." </div> <div class="quote-arrow"></div> <div class="centered"><h6>Jane Smith</h6><img src="http://demo.appfinite.net/aspire/img/jane-circle.png" alt=""></div> </div> <div class="one-third"> <div class="quote">Lorem ipsum dolor sit amet, consectetur adipisicing elit, sed do eiusmod tempor." </div> <div class="quote-arrow"></div> <div class="centered"><h6>Wes Straham</h6><img src="http://demo.appfinite.net/optimal/img/wes-circle.png" alt=""></div> </div>
Front Page 13 Widget
You can show your latest blog posts using the featured custom posts types plugin. Simply add the widget and publish the changes.
So this is how you can configure the Aspire theme with Genesis. For adding social share icons, you may want to consider using the Social Warfare plugin.
We hope you found this post useful and learned how can you set up the Aspire Pro theme. If you did, please consider sharing this post with your friends and fellow bloggers on social media. You may also want to check out our Kreativ Pro review, Outreach Pro review and the Magazine Pro review.
They are best Genesis child themes for 2019.
For more related posts, you may want to check out our blog section.
Aspire Pro
- Features
- Performance
- Support
- Ease of Use
- Pricing
Summary
Aspire Pro is one of the best child themes for Genesis Framework which is a business theme. In this post, we are going to show you the complete Aspire Pro theme documentation and how can you make the theme like the demo!
How To Remove Latest Blog In Aspire Pro
Source: https://www.awpguide.com/wp-guides/aspire-pro-documentation/
Posted by: beanandents.blogspot.com

0 Response to "How To Remove Latest Blog In Aspire Pro"
Post a Comment